Fabrication of the LETG instrument is a collaborative effort between the Stichting Ruimteonderzoek Nederland in Utrecht (SRON) and the Max Planck Institut für extraterrestrische Physik in Garching (MPE). MPE has the responsibility of characterizing individual grating facets and assembling them in threes into modules that will be mounted on the grating element support structure (GESS) at SRON. The characterization tests that will be performed by MPE are: grating microscopic inspection for defects (holes and blockages), laser diffraction determination of grating facet period, near infrared transmission spectroscopy for determination of grating bar geometry, x-ray diffraction efficiency measurements on a small sample basis, and measurement of the alignment angle of each facet within the module. In this memo I will describe my current knowledge of these tests gained through discussions with P. Predehl and H. Lochbihler and my visit to MPE in September 1994.
Grating facets are manufactured by Heidenhain GmBH and delivered in batches to MPE. A grating facet consists of a gold ``foil'' that is the grating and support wires bonded to a stainless steel cylinder. Approximately 900 facets will be produced for the flight LETG, including spares. As the facets are received at MPE they undergo an visible inspection to detect any gross problems: large defects, wrinkles, etc.. The facets are then examined under a microscope for evidence of missing grating bars, blocked regions, or local distortions in the grating bar spacing or direction. The microscope is equipped with a video camera that can be used with a computer to grab frames. This inspection is primarily used to weed out substandard facets. There are presently no definite plans for what data will be recorded from this initial examination or how it will be treated. This is an area currently being studied by the group at MPE; it is possible that Fourier analysis of microscope images will be used to derive some set of inspection parameters.
There are a few items from this inspection that could supply information for subassembly calibration. This is essentially the only point at which there is the possibility of measuring the widths of the bars that make up the fine and coarse support structure of the grating. This is also the point at which the fraction of the area covered by holes or blockages can be measured. Both of these items will enter into the determination of the obscuration of the grating. Another item that will be measured is the angle between the grating bars and the fine support structure bars. This angle must be accounted for when the alignment of the facets to the modules is performed as I will discuss below.
The grating facet period is determined by using the grating in transmission to diffract light from a HeCd laser (l=441.6 nm). Light from the laser is directed through a beam expander (×100) and the expanded beam is limited by a 12 mm × 5mm aperture before the facet is illuminated. A photodiode is mounted at the aperture plane as a reference for the intensity of the illumination. The grating is held in a mount which has two adjustments: one to rotate the grating about its normal in order to adjust the plane of diffraction and the second to rotate the grating about the normal to the diffraction plane in order to obtain normal incidence illumination of the facet. The diffracted light is focused onto a slit 5 µm wide and 3 mm high in front of a photodiode. This lens, slit, and photodiode are mounted on an arm so that they can move together as a unit. The angular position of the arm is read using an encoder with a precision of 0.0001°.
Measurement of a grating facet begins with a rough alignment. The facet is put on a magnetic holder which will hold the facet but allow for large adjustments easily. This holder is mounted on a rough alignment tool that consists of a T-shaped optical bench with an alignment target as the top of the ``T'' and the facet holder at the bottom. Diffracted laser light is aligned by hand to a line on the target to achieve a rough alignment. Laser diffractometer testing then proceeds by the following steps.
Typically several gratings are measured in a single sitting so the initial measurement of the zero degree reference is done only once at the beginning not between each facet measurement. The data from the angle scan without the grating in place is collected by the computer but at present the file is being overwritten each time a zero is done. Lochbihler told me that during the characterization of the diffractometer they studied this zero angle scan and got a result that agreed with the illumination of the aperture with the top of a Gaussian beam profile as they have with the apparatus.
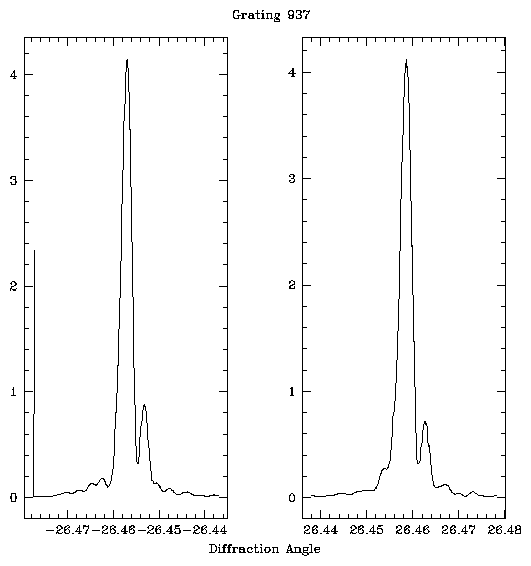
The output files from the test are ASCII text files with two columns of numbers: the position angle in degrees and the ratio of photodiode currents; measurements are made at roughly 400 position angles in each order. Because of the way the detector arm is moved the position angles are not guaranteed to be evenly spaced: occasionally the same angle will appear twice or an angle will be skipped. Samples of the data are in the directory
/data/juda1/juda/asc/gratings/letg/data/diffractometer/.
The file names are the grating identification number followed by a ``.p'' or ``.m'' extension for positive or negative order respectively. One pair of diffraction peak scans is plotted in figure 1.

These sample files and those from the near infrared spectrometer discussed below are not from flight facets; the files represent the type and format of the data from these tests but not necessarily the quality we should expect for the flight article.
The diffractometer test is used to determine the average period of the facet over the illuminated region; about 1/3 of the grating area is illuminated during the test. The period is derived from the locations of the plus and minus first order diffraction peaks via the grating equation, ml = psinq. The 12 mm width of the aperture means that roughly 12,000 grating slits contribute to the diffraction. The full width at half maximum of the diffraction peaks are found and the observed resolving power calculated; for good facets the observed resolving powers are in the range 9000-10,000, close to ideal. Departures of the grating foil from a plane lead to distortions of the diffraction pattern that effectively widen the observed diffraction peaks for visible wavelengths. These deviations are not important in the x-ray regime so the resolving powers derived in this test do not translate into expected x-ray performance.
The grating bar cross section profile is characterized by using the fact that the gratings are good polarizers in the near infrared. The theory behind this has been extensively developed[1,2] by H. Lochbihler of of the MPE side of the LETG team.
Characterization measurements are carried out in a Varian Cary Model 5 transmission spectrometer. The spectrometer comes from the factory equipped with computer control and is self-calibrating. The transmission is determined by comparing the signal for a light path through the sample to the signal for a reference light path. The spectrometer stores a normalization comparison, taken with no sample, which it uses to convert the measured ratio to transmission. The spectrometer has been modified to include: a Glan prism, apertures, and hardware to hold and position the facet. The prism linearly polarizes the light with its electric field vector perpendicular to the grating wire direction. The aperture is 2 mm × 6 mm, which limits the angular divergence of the beam to 0.4° × 1.2°. When a facet is being measured a ``facet'' with only the coarse and fine support structures is inserted into the reference path to cancel wavelength dependent effects caused by the support structure. During measurements the sample chamber is purged with N2 to minimize extinction of the light by water vapor. Measurement proceeds as follows:
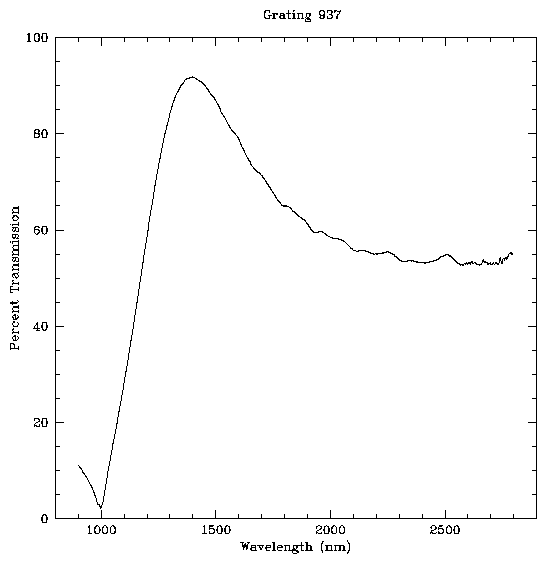
The data are stored as ASCII text files containing roughly 1900 lines with two columns each: wavelength in nm and percent transmission. Sample data can be found in the directory
Figure 2 is an example of one of the spectra.

Grating bar cross section profiles are approximated by trapezoids. The three characteristic dimensions, thickness, width, and slope, are derived by using three characteristic numbers determined from the NIR spectrum: the wavelength of the transmission peak, the amplitude of the peak, and the minimum amplitude for wavelengths longward of the peak. The wavelength of the peak is most strongly coupled to the thickness of the bars, the minimum amplitude longward of the peak is most strongly coupled to the width of the bars, and the amplitude of the peak is most strongly coupled to the slope of the sides. The relationships connecting the bar parameters to the spectral shape parameters are based on the results of modeling of the expected spectrum for a given input bar geometry. An additional piece of data is required for the model, the near infrared optical constants of the gold as plated to form the gratings. The optical constants for gold foil samples produced by Heidenhain GmBH through the same electroplating technique as they use to produce the gratings were measured using ellipsometry.
Using model curves from Lochbihler's thesis[1] for gratings with bar dimensions near those of the LETG, I find that variations the derived bar thickness scales with the deviations in the wavelength of the peak as ~ 0.65 µm/$micro;m, variations in the derived bar width to deviations in the transmission minimum at long wavelengths goes as ~ -0.007 µm/percent transmission , and variations in the derived slope angle to deviations in the transmission at the peak goes as ~ -0.65°/percent transmission. The amounts quoted above are rough estimations and don't take into account any coupling between variations in the parameters. The derived uncertainties on bar width and thickness are claimed to be about 20 nm.
Only a small sample of grating facets, possibly no flight units, are expected to be characterized with x-ray diffraction measurements. There are at least three locations at which x-ray measurements have been performed, the ZETA facility at MPE, the PANTER facility, and the BESSY synchrotron. The configurations and detectors used vary for each facility. At ZETA a proportional counter is used as the primary detector, at PANTER a position sensitive proportional counter (the ROSAT prototype) is used, and at BESSY Si diodes are used. We can expect to receive angle scan data for the tests that are done. It may be possible that we will receive photon event lists from tests done at the PANTER facility; however, Predehl was concerned that supplying the amount of supporting material required to make this information useful would be too large of a burden at his end. At present I have no sample data from any of these facilities. I would expect that the data from the angle scans would once again be ASCII text files with columns for position angle and x-ray intensity.
The gratings are aligned within the modules by taking advantage of their polarization capabilities in the near infrared. For the LETG to function properly the grating bars on all the facets must be aligned in the same direction. The grating facets are mounted in modules which are then attached to the GESS using two bolts. There is no provision for aligning the modules to the GESS so the angle for alignment of the facets in a module must be specified based on measurements of the manufactured GESS and module; the tolerance for this alignment is 40 arcsec.
The alignment technique has been described in Anderson et al.[3] and Lochbihler et al.[4]. A near infrared light source is directed through a Glan prism polarizer and then through a photoelastic modulator (PEM) to generate a polarization modulated beam of light. The prism and PEM are mounted on a table that can be rotated with the position angle readable to 0.0001°. The polarized beam is directed through the grating facet and into a photodiode. A lock-in amplifier is used to detect the second harmonic of the modulated polarization. The signal is proportional to the sine of the angle between the grating bars and the mean polarization axis. The facet is rotated to null the second harmonic aligning the facet with the polarized beam; note that the sign of the signal indicates the direction in which the facet must be rotated to null the signal. The edge of the grating module is used as a mechanical reference for the alignment angle. Alignment proceeds as follows:
The PEM polarization angle is sensitive to temperature so the temperature is monitored and the shift with changes in temperature taken into account. I expect that the alignment measurement data will be available as ASCII text files with three rows of two numbers: the polarization angle and the photodiode signal.
Once the facets are aligned within a module there is only one location on the GESS where the module can be used. Each facet within the module can have a different specified alignment angle depending on the angle the grating fine support structure makes with the grating bars; there is roughly 1 arcsec of correction for every arcmin the fine support structure is away from perpendicular to the grating bars. A current unsolved problem is how the angular offset between the grating bars and the fine support structure will be determined. One possibility that is under study is to grab video frames of images of the grating bars and fine support structure bars under the microscope. Two different images are required because the widely different periods of the two structures require different magnification. Fourier analysis techniques can then be used to determine the position angle of the bars within the image.
At the time of my visit to MPE work was finishing on the fabrication of the alignment fixture. Initial tests had been performed on aligning and bonding the facets to the module. It was possible to align the facets to ~ 1 arcsec but as the epoxy used to bond the facet to the module cured the facet appeared to rotate by as much as 20 arcsec; this is less than a 1 µm shift on the circumference of the facet. While this is still within the tolerance it would be highly desirable to reduce, if not eliminate, the effect.
At present we have a good idea of the current plans for characterizing LETG facets at MPE. There are still several critical areas where the plans are not yet decided; this makes it difficult for the ASC to complete a design for the treatment of subassembly calibration data. In addition the procedures adopted by MPE were not in my view designed with the idea of ``calibration'' as a driving principle but rather ``verification''. I suggested to Predehl and Lochbihler several changes to how the data might be handled which they politely agreed to consider; whether any of these suggestions will be adopted remains to be seen. Of greatest concern as an overall calibration issue is the lack of x-ray diffraction efficiency measurements for flight grating facets. Even if the near infrared transmission measurements supply a better method for deriving average grating bar profiles, grating imperfections can be expected to cause deviations in the x-ray diffraction efficiency from those modeled based on the average grating bar profile.
Dr. Michael Juda
Harvard-Smithsonian Center for Astrophysics
60 Garden Street, Mail Stop 70
Cambridge, MA 02138, USA
Ph.: (617) 495-7062
Fax: (617) 495-7356
E-mail: mjuda@cfa.harvard.edu