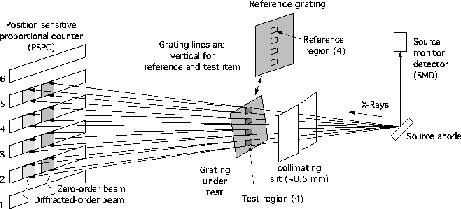
Figure 8: X-GEF Test configuration.
The High-Energy Transmission Grating, HETG, is composed of 336 individual grating elements, each approximately 25 mm square, mounted on the HETG Element Support Structure, HESS. Out of these 336 gratings, 144 are HEG gratings covering HRMA shells 4 and 6; and 192 are MEG gratings covering shells 1 and 3. Flight fabrication at the Space Micro-Structures Laboratory in MIT's Building 37 has been on-going for a little over a year and currently (mid July 1996) we have over 300 gratings that are fabricated, fully tested, meet specifications, and are available to populate the flight HETG. We expect to finish flight grating fabrication and their subassembly test in the next weeks. The final major step in HETG construction is the mounting and aligning of the gratings to the HESS; currently 2 of the 12 sectors of gratings are mounted and aligned. With the HETG well on its way to completion, this report describes the nature of the key subassembly measurements that are in hand and will be used to generate an overall instrument model.
The HETG operates by diffracting the X-rays from a source by an angle very nearly proportional to the X-ray wavelength. As described in Canizares, et al. (1994) the key instrument performance metrics are the Effective Area and the Resolving Power. The gratings' effect on these performance parameters is primarily through the grating diffraction efficiency and the grating period and period uniformity. Additionally the details of the Rowland design (astigmatism) and grating alignment (cross-dispersion width) come into play. Focusing on measuring the diffraction efficiency and period properties of the gratings we have created two subassembly test facilities in MIT's Building NE80 (Dewey, et al. 1994): the X-ray Grating Evaluation Facility, X-GEF, and the Laser Reflection test, LR.
With invaluable help from Dale Graessle (SAO), Tom Markert (MIT) and colleagues initiated synchrotron measurements of the diffraction efficiency of the HETG gratings (Markert, et al. 1995). These synchrotron measurements serve to challenge and develop realistic models of the grating diffraction efficiency. Currently a piece-wise linear grating bar model developed by John Davis (MIT/ASC) is providing the best fits to the X-ray data. The synchrotron measurements also provided well-measured gratings that are used as reference standards in the X-GEF system.

Figure 8: X-GEF Test configuration.
The basic X-GEF test configuration is shown in Figure 8. The source of X-rays is an electron-impact source (Manson multi-anode) which has an X-ray spectrum that is made up of a continuum plus one or more discrete lines. The incoming X-ray beam, collimated by either a slit or 1D optic, illuminates a grating. X-rays emerge from the grating into various diffraction orders and are detected by a position sensitive proportional counter, PSPC, which has a spatial range of +/- 60 mm. The goal of the measurement is to measure the fraction of the incoming beam (at the line energy) that is diffracted into the combined first-orders of the grating.
Because of the presence of continuum and other lines in the source and the poor energy resolution of the PSPC, there are many error sources that can foil a straight-forward measurement of the efficiency based only on with-grating/without-grating PSPC measurements. To avoid these pit falls we have installed in X-GEF two gratings (one HEG and one MEG) which serve as efficiency references. The ratio of grating-under-test diffracted count rate to reference-grating diffracted count rate can then be made directly and with a much reduced sensitivity to systematic errors. The known reference-grating efficiency is then used to derive an efficiency for the grating under test.
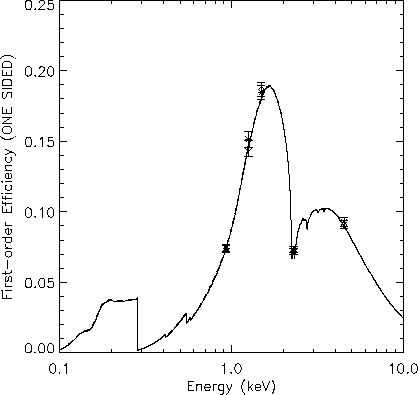
Two gratings are tested in each unattended overnight X-GEF run. The 300 Mb of data collected are written to two DAT tapes (one stays at MIT and one goes to ASC.) Figure 9 shows an example of the results of X-GEF data analysis which is further described in Flanagan, et al (1995). The measured plus and minus first order efficiencies at five energies (Cu L 0.930 keV, Mg K 1.254 keV, Al K 1.486 keV, Mo L 2.293 keV, and Ti K at 4.511 keV) are shown along with a model fit. For HEGs a measurement is made at Fe K 6.400 keV as well.
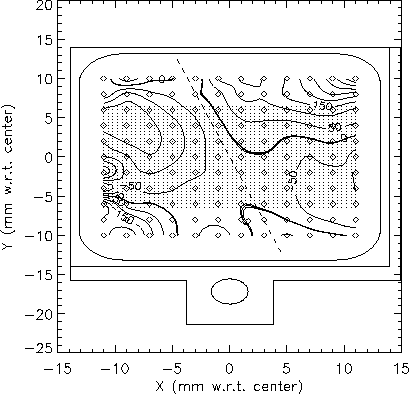
In the Laser Reflection test a laser beam (HeNe 632.8 nm for MEGs and HeCd 325.0 nm for HEGs) is directed sequentially at an array of locations on each grating facet (10x11 or 11x12 locations). At each location the angle of the reflected and diffracted beams from the grating are measured and a local period is computed. The test setup includes MEG and HEG period references which are measured along with the sample and ensure the stability of the measurements. Each execution of the LR test creates an ASCII data file (13Kb or 16Kb) which can be analyzed to create a period contour map, Figure 10, and estimates of the grating average period, P, and period variations, ``dp/p". The data can be re-analyzed limited to the ``active region that is expected to be illuminated by the HRMA to get a more accurate estimate of the gratings' effect on performance.

Figure 9: Measured and modeled first-order efficiency of the
central region of MEG
grating MF1567. The model is simultaneously fit to +/- 1st-order,
zero-order, and 2nd-order data. The interpolated combined efficiency at
1 keV of 17.8% exceeds the required average of 14%.

Figure 10: Period contour plot of MEG grating MF1567 from LR test data. Each
diamond represents a measurement point. The dotted region is the
``active" region that will be illuminated by X-rays from the HRMA. The
period variation in the active region, dp/p = 67 ppm, is well below
the budgeted 180 ppm.
The HETG subassembly data are currently summarized in three ASCII TAB-delimited text files: one containing general information on each grating, one containing LR analysis results, and one containing summary X-GEF results. The full LR and X-GEF datasets are being ``ingested" by the ASC for archiving and are sufficient to allow the creation of an accurate HETG model.
For further information, see the HETG homepage and the TOGA page.
Canizares, C., Juda, M., and Plucinsky, P., AXAF News, Issue 2, 1994 pp. 9-13. ``The Spectroscopic Capabilities of AXAF-I"
D. Dewey, D.N. Humphries, G.Y. McLean, D.A. Moschella, SPIE Vol. 2280, 1994, pp. 257-271. ``Laboratory Calibration of X-Ray Transmission Diffraction Gratings"
K.A. Flanagan, D. Dewey, and L. Bordzol, SPIE Vol. 2518, 1995, pp. 438-456. ``Calibration and Characterization of HETG grating elements at the MIT X-Ray Grating Evaluation Facility"
T.H. Markert et al., SPIE Vol. 2518, 1995, pp. 424-437. ``Modeling the Diffraction Efficiencies of the AXAF High Energy Transmission Gratings"
Daniel Dewey